Delicious Oven Fried Chicken Fingers Recipe
Are you craving crispy chicken but looking for a healthier option? Then you’ve come to the right place! As a nutritionist and food blogger, I’ve put together a delicious gluten-free recipe for teriyaki and buffalo oven-fried chicken fingers that will have your taste buds dancing.
Not only is this recipe free from gluten, but it also avoids dairy, making it perfect for those with dietary restrictions or intolerances. And don’t worry, just because we’re going healthy doesn’t mean we’re sacrificing flavor. In fact, the combination of teriyaki and buffalo sauce creates an explosion of flavors in your mouth that is both savory and spicy.
But why stop there? These chicken fingers are incredibly versatile! Serve them as a main course for dinner paired with some cilantro rice or sliced veggies, or serve them up as a snack during game day paired with some hot honey or kale chips. Trust me; everyone will be asking for the recipe once they taste this crispy fried goodness.
And best of all, preparing these tasty chicken fingers is incredibly simple, using just a few simple ingredients that you probably already have lying around your kitchen. So preheat your oven to 450 degrees, grab your favorite baking sheet, and let’s get started on making some mouth-watering teriyaki and buffalo oven-fried chicken fingers that are sure to impress!
Why You’ll Love This Recipe

If you’re on the hunt for a delicious and healthy recipe that still packs a punch of flavor, look no further than my Teriyaki and Buffalo Oven Fried Chicken Fingers. These gluten-free chicken fingers are perfect for anyone looking for a fulfilling meal without any dairy, gluten or guilt.
What makes this recipe so great, you might ask? Well, for starters, it’s incredibly simple to make. With just a handful of easy-to-find ingredients and some basic cooking skills, you can whip up a batch of these chicken fingers in no time at all. And if you’re a fan of spice, you’ll love the addition of buffalo sauce in these oven-fried chicken fingers.
But that’s not all! Perhaps one of the best things about this recipe is that it’s incredibly versatile. You can easily substitute different ingredients to cater to your specific dietary needs or tastes. Swap out almond flour with rice flour for keto-friendly option, or use cornstarch instead of gluten-free flour for a crispy texture.
Plus, these chicken fingers can be served as an appetizer or as part of the main course. Pair them with some hot honey and kale chips or serve them up with some teriyaki sauce and steamed veggies – they taste great no matter how you choose to eat them.
So whether you’re new to eating gluten-free or just looking for a new healthy and tasty dinner option for your family, don’t hesitate to give these Teriyaki and Buffalo Oven Fried Chicken Fingers a try – they’re sure to be a hit!
Ingredient List

Let’s have a look at the list of ingredients you need to make these delicious Teriyaki and Buffalo Oven Fried Chicken Fingers. This recipe calls for simple ingredients that are easily available at your local grocery stores. Make sure to check the label of each item to ensure they are gluten-free.
Here is the list of ingredients:
- 1 ½ pounds boneless skinless chicken breasts (or chicken tenders for quick prep)
- Salt (1 teaspoon)
- Black pepper (1 teaspoon)
- Garlic powder (1 teaspoon)
- Baking powder (2 teaspoons)
- Cornstarch (½ tablespoon)
- Rice flour (½ cup) (or gluten-free all-purpose flour)
- Almond flour (½ cup)
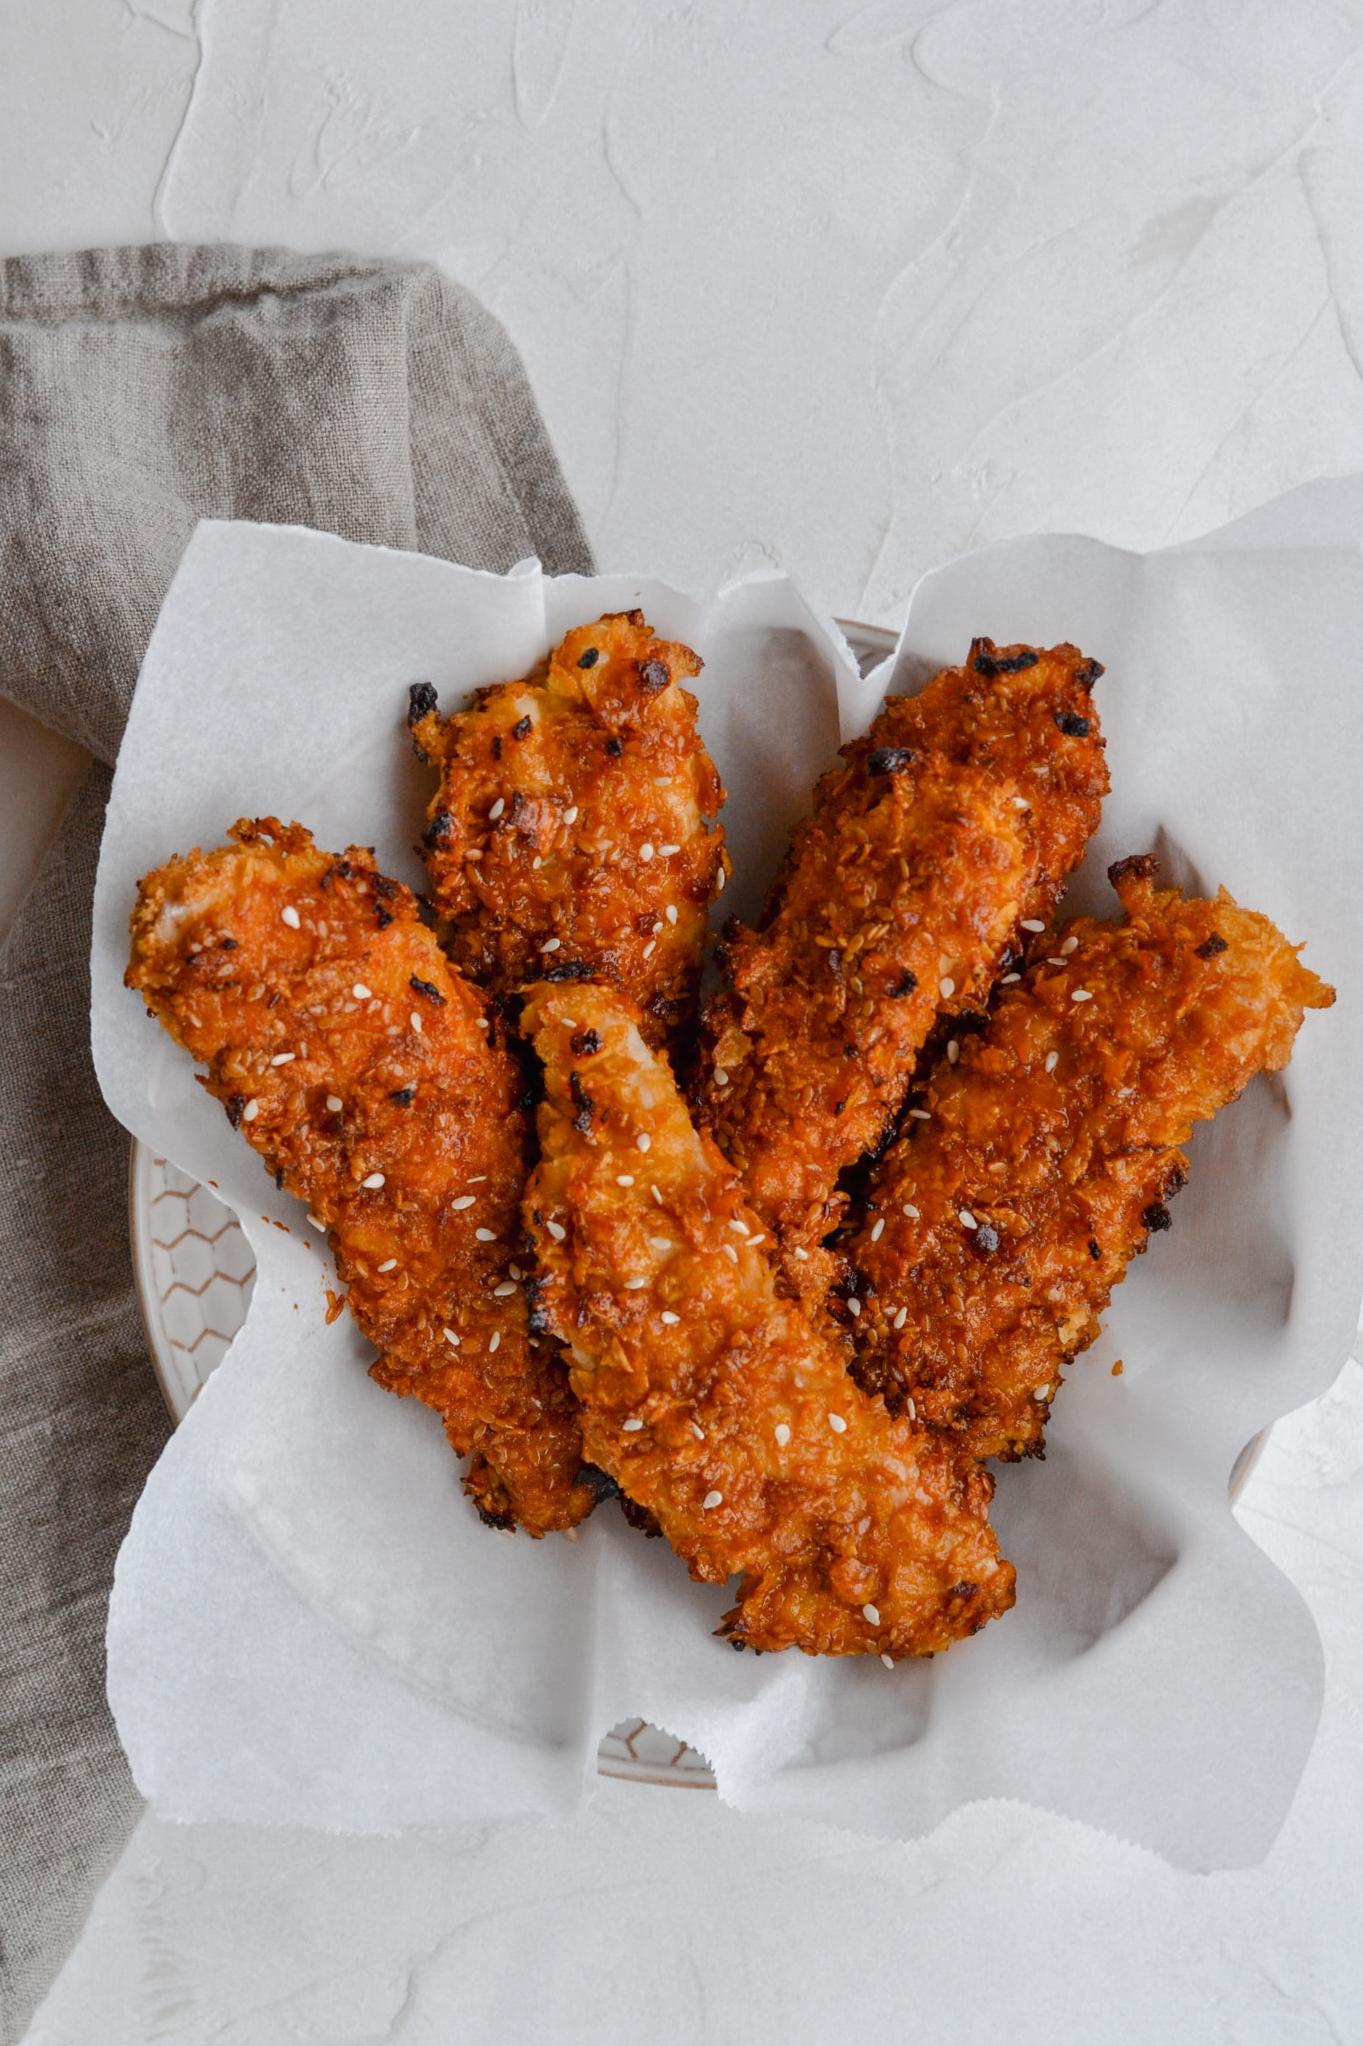
- Panko breadcrumbs (1 cup) (or gluten-free panko breadcrumbs)
- Olive oil spray
- Teriyaki sauce (¼ cup)
- Buffalo sauce (¼ cup)
- Hot honey (to taste)
The Recipe How-To

Now comes the fun part – let’s cook! I’m going to walk you through the step-by-step instructions on how to make these delicious Gluten-Free Teriyaki and Buffalo Oven Fried Chicken Fingers that will have your taste buds dancing.
Ingredients:
- ½ pound boneless, skinless chicken breasts
- 1 cup gluten-free all-purpose flour
- 1 teaspoon garlic powder
- 1 teaspoon salt
- 1 teaspoon ground black pepper
- 2 teaspoons baking powder
- 1 cup unsweetened almond milk
- 1 cup panko breadcrumbs (for gluten-free breadcrumbs use gluten-free panko)
- ⅓ cup teriyaki sauce
- ⅓ cup buffalo sauce
- Hot Honey (optional)
Instructions:
Step 1: Preheat oven
Preheat oven to 450°F (230°C).
Step 2: Prepare chicken
Cut the chicken breasts into long strips, about an inch wide.
Step 3: Coat chicken
In a bowl, mix the gluten-free flour, garlic powder, salt, black pepper, and baking powder. In another bowl, pour the almond milk. In a third bowl (or plate), pour the panko breadcrumbs.
Coat each chicken strip in the flour mixture, then dip it into the almond milk, and then coat it with panko breadcrumbs. Place breaded chicken strips on a lightly oiled baking sheet.
Repeat this process until all of your chicken strips are coated in breadcrumbs.
Step 4: Bake chicken
Bake chicken for about 12 minutes or until lightly golden brown and crispy.
Step 5: Add flavor sauces
Once cooked, divide the cooked chicken strips into two bowls. Pour teriyaki sauce over one bowl and toss to coat. In the other bowl, pour buffalo sauce over the chicken strips and toss to coat.
Step 6: Serve
Finally, you can serve these crispy and flavorful chicken fingers with hot honey (optional) or your favorite dipping sauce.
There you have it! A delicious and easy recipe for Gluten-Free Teriyaki and Buffalo Oven Fried Chicken Fingers that anyone can make. The perfect appetizer or main course that is sure to please any guest – even those who eat gluten-free.
Substitutions and Variations

One of the joys of cooking is that you can always experiment and make substitutions and variations to match your taste buds. That is why I decided to add this section to the article, so you can have fun with the recipe and customize it according to your preferences.
Firstly, let’s discuss the chicken. This recipe calls for boneless skinless chicken breasts, but you are free to use chicken tenders, chicken thighs or even frozen chicken wings. However, keep in mind that cooking time may vary depending on the type of chicken you choose.
For those who eat gluten-free, swap regular flour for gluten-free flour or almond flour. Additionally, use gluten-free panko breadcrumbs instead of regular ones.
If you’re looking for a healthier option, consider swapping out the frying method for baking it in the oven. You can still get crispy chicken by using rice flour or cornstarch with baking powder or bread crumbs.
For the sauce, this recipe offers a fusion of teriyaki and buffalo flavors. But if you don’t like spicy food, you can skip the buffalo sauce altogether and go for a more classic teriyaki sauce. Alternatively, if you love spicy food, add some cayenne pepper to give it some extra heat.
Lastly, to add a little twist to your dish consider serving the oven-fried chicken fingers with kale chips instead of traditional fries or onion rings. It will give it more crunch while adding extra nutrition value.
The options are endless when it comes to substitutions and variations on this recipe. Get creative and experiment with different flavors and ingredients until you find your favorite combination!
Serving and Pairing
Now that the Teriyaki and Buffalo Oven Fried Chicken Fingers are ready to eat, you may be wondering how to serve and pair them for the best experience.
These crispy chicken fingers taste delicious on their own, but they can also be paired with a variety of dipping sauces. A classic favorite is ranch dressing, but you could also try blue cheese or honey mustard. For those who prefer a spicy kick, sriracha or hot honey would be great options.
To balance out the flavors in the chicken fingers, consider incorporating some fresh veggies into your meal. A simple side salad with kale chips and shredded carrots would provide a crunchy texture that contrasts well with the soft chicken. Roasted vegetables like broccoli or cauliflower would also pair nicely with the chicken fingers.
If you’re looking for something more substantial, you could serve these chicken fingers over a bed of rice or quinoa. The mild flavor of the grains would complement the bold taste of the chicken fingers nicely.
Finally, consider serving something refreshing to drink alongside your meal. A cold glass of lemonade or iced tea would quench your thirst while also cutting through any spiciness from the buffalo sauce.
So go ahead and decorate your plate with these appetizing chicken thighs and enjoy them with any side dish and drinks of your preference!
Make-Ahead, Storing and Reheating

Are you looking for a recipe that can be meal prepped in advance? These Teriyaki and Buffalo Oven Fried Chicken Fingers are perfect for that! To make these chicken fingers ahead of time, simply prepare the chicken as directed in the recipe and store them in an airtight container in the refrigerator until you are ready to cook them.
If you have leftovers, don’t worry! These chicken fingers still taste great the next day when reheated. You can reheat them in the oven or using an air fryer to recapture their delicious crunchiness. To reheat them in the oven, place the chicken fingers on a baking sheet and heat them up at 350°F for about five minutes. For an air fryer, preheat it to 375°F and cook for three to four minutes.
When it comes to storing these chicken fingers, keep in mind that they are best eaten fresh. If you plan on keeping them for more than a day or two, store them in a sealed container or zip-lock bag in your fridge. You can also freeze them if you plan on storing them longer than a few days, but keep in mind that this may affect their texture as they will become slightly mushier if frozen and thawed.
These chicken fingers go well with any side dish of your choice. They can be paired with crispy kale chips or any type of vegetable salad that fits your preferences. They are also great with a steaming hot rice bowl, especially when paired with drizzled hot honey on top for an extra kick of sweetness. Don’t hesitate to experiment with different pairings to find what works best for you.
Now that you know how to make these chicken fingers ahead of time and how to store and reheat leftovers properly let’s get cooking!
Tips for Perfect Results

Cooking is an art that requires attention and dedication; and when cooking healthy, gluten-free and dairy-free recipes, great care should be taken to ensure that the ingredients are balanced and cooked to perfection. Therefore, while preparing these oven-fried chicken fingers, here are some tips to ensure you get the perfect results.
Firstly, make sure you use gluten-free panko breadcrumbs or almond flour as they give these chicken fingers the desired crunchiness. The panko should be crushed well and mixed with seasonings like garlic powder, black pepper, and salt.
Secondly, remember to let the coated chicken fingers rest for about 5 minutes before placing them in the oven. This helps set the coating firmly and prevents it from falling off during cooking.
Thirdly, avoid overcrowding the baking sheet when preparing these chicken fingers as it causes uneven cooking. Instead, place them in a single layer with enough space between each piece.
Fourthly, preheat your oven to 450 degrees Fahrenheit for about 10 minutes before placing the chicken fingers in it. This ensures that the oven reaches the perfect temperature for an even bake.
Fifthly, consider using an air fryer instead of an oven. Air-frying results in a crispy texture without adding unnecessary calories from oil.
Lastly, flip the chicken fingers halfway through cooking time for even browning on both sides. This way, each piece will cook evenly until fully done.
Follow these tips carefully and achieve a result that is crispy on the outside while juicy and tender on the inside – perfect oven-fried chicken fingers every time!
Bottom Line
:
In conclusion, this Teriyaki and Buffalo Oven Fried Chicken Fingers recipe is a great addition to your regular meal rotation. It is not only delicious but also gluten-free and dairy-free, making it an ideal option for those with dietary restrictions. By substituting traditional ingredients with healthier alternatives, you can enjoy this classic dish without feeling guilty about your food choices.
Moreover, this recipe is versatile, and you can make variations to suit your taste preferences. Whether you prefer spicy or sweet, you can adjust the seasoning accordingly to create the flavor profile you desire. Additionally, making the chicken fingers in an oven instead of a deep fryer or air fryer saves on excess oil ingestion while still retaining the crispy texture.
Incorporating healthy eating habits does not mean that you have to give up your favorite meals altogether. It means that you should use high-quality fresh ingredients and smart substitutions when possible, without sacrificing flavor. This Teriyaki and Buffalo Oven Fried Chicken Fingers recipe is proof that healthy eating can be tasty too!
So go ahead, give this recipe a try, and let me know what you think. Remember always to prioritize nutritious yet yummy meals for longevity!

Teriyaki and Buffalo Oven Fried Chicken Fingers - Gluten Free Recipe
Ingredients
- 3 lbs boneless skinless chicken breasts, trimmed of fat and cut into strips
- 1/2 cup rice flour (or use your favorite GF baking mix)
- 1 teaspoon salt
- 1 teaspoon pepper
- 2 tablespoons cornstarch, divided
- 2 tablespoons cold water, divided
- 1/4 cup white sugar
- 1/4 cup light brown sugar, packed
- 1/2 cup gluten-free soy sauce
- 1/4 cup cider vinegar
- 2 garlic cloves, minced
- 1/2 teaspoon ground ginger
- 1/4 teaspoon black pepper
- 1/4 cup butter
- 1/4 cup hot sauce
Instructions
- Preheat oven to 400 degrees. Line a 15x10x1-inch baking pan with aluminum foil, and lightly coat with cooking spray.
- After cutting chicken, thoroughly pat dry with paper towels. This step is necessary so your chicken won't get soggy when it's cooking in the oven. Place flour, salt, and pepper in a large resealable bag, seal, and shake to combine. Add the dried chicken pieces, seal bag, and shake to coat.
- For Teriyaki tenders: In a small saucepan, over low heat, combine 1 tablespoon cornstarch, 1 tablespoon cold water, white sugar, brown sugar, GF soy sauce, cider vinegar, garlic, ginger, and black pepper. Bring sauce to a simmer, stirring frequently until sauce thickens and begins to bubble. Dredge half of the flour coated chicken pieces through the teriyaki sauce and place on prepared baking pan in a single layer.
- For Buffalo tenders: In a small saucepan, melt the butter over low heat. Once butter is melted, stir in your favorite hot sauce (we use Frank's hot sauce). In a small glass, dissolve 1 tablespoon cornstarch in 1 tablespoon cold water. Slowly stir the cornstarch mixture into the hot sauce mixture. Continue cooking and stirring until sauce is slightly thickened and bubbly. Dredge the second half of the floured chicken pieces through the hot sauce and place on the prepared baking pan in a single layer.
- Put baking pan with chicken in the preheated oven and cook for 25 to 30 minutes or until juices run clear.
Add Your Own Notes
Nutrition
Recommended Recipes Just For You
None found