Mouth-Watering Chocolate Pudding Recipe for Dessert Lovers
Welcome to my dairy-free, gluten-free, and no-cook chocolate pudding recipe! If you’re a chocolate lover, you’re in for a treat with this recipe. Whether it’s for dessert after a meal or a midday snack to indulge in, this chocolate pudding is an easy and healthy option that is sure to satisfy your sweet tooth.
Unlike traditional chocolate pudding recipes that are loaded with dairy and refined sugar, this recipe is made with natural and wholesome ingredients. It is completely vegan and uses ingredients like coconut milk, maple syrup, and unsweetened cocoa powder to offer a healthier alternative. Plus, you don’t have to worry about going through the hassle of cooking the pudding as it’s a no-cook recipe!
Not only will you save time by not having to cook the pudding, but you’ll also save on calories while still enjoying the rich flavor of chocolate. With the added benefits of using natural ingredients instead of processed ones, you can feel good about indulging in this guilt-free dessert.
So sit back and relax as I guide you through creating this delicious no-cook chocolate pudding recipe that will become a go-to in your kitchen. Once you taste it for yourself, you’ll see why it’s one of my favorites!
Why You’ll Love This Recipe
Are you a chocolate lover who craves for a delicious and satisfying chocolate pudding but is lactose intolerant or trying to avoid dairy? Look no further because this dairy-free and no-cook chocolate pudding recipe is exactly what you need!
But why should you love this recipe? First and foremost, it’s incredibly easy to make. With just a few key ingredients such as cocoa powder, maple syrup, and coconut meat, you’ll have a guilt-free dessert ready in no time. No need to slave over a hot stove or use any fancy cooking techniques, all you need is a blender.
Secondly, this pudding is not only dairy-free but also vegan-friendly. It contains plant-based ingredients and non-dairy milk such as almond milk, oat milk, or cashew milk that provide the same creamy texture as regular milk.
Additionally, if you are someone who enjoys gluten-free desserts or follows a low-carb diet or low FODMAP diet or even on Keto, this recipe is perfect for you! It contains no gluten or refined sugar – just healthy and natural sweeteners like maple syrup and coconut sugar.
Moreover, the rich cocoa flavor combined with the sweet maple syrup makes every bite heavenly. And adding a pinch of sea salt and vanilla extract to the recipe enhances the flavors to perfection.
Lastly, this recipe is extremely customizable with substitutions allowed in many forms. Whether adding different plant-based milk types or frozen fruits or toppings of your choice for presentation, the possibilities are endless.
Overall, whether you are lactose intolerant or not, this dairy-free and no-cook chocolate pudding recipe will undoubtedly become your new favorite dessert. So why wait? Go ahead and give it a try today!
Ingredient List

Let’s take a look at the ingredient list of this dairy-free, no-cook chocolate pudding recipe. You will need the following ingredients in order to make this heavenly treat:
For the Pudding:
2 cups coconut meat1 ½ cups water (half for blending and half for soaking)1/4 cup unsweetened cocoa powder1/4 cup maple syrup3 tablespoons cornstarchor2 tablespoons agar agar powder1 teaspoon vanilla extractA pinch of sea salt
For Serving:
Dark chocolate, shaved or gratedSea salt(optional)
The best part? These ingredients are all gluten-free, dairy-free and vegan!
The Recipe How-To

Now that we have our ingredients ready, it’s time to start making our dairy-free and no-cook chocolate pudding!
Step 1: Blend Our Ingredients
Firstly, in a high-speed blender or food processor, blend together 1 cup of coconut meat, 1/4 cup of unsweetened cocoa powder, 1 1/2 cups of almond milk, 3 tablespoons of maple syrup, and a pinch of sea salt until the mixture is creamy and smooth in texture.
Step 2: Thicken The Pudding
Next, heat the mixture on medium heat on the stovetop in a saucepan, stirring well to thicken. Combine 4 tablespoons of cornstarch with 1/4 cup of water in a small mixing bowl until completely smooth. Continue cooking the blended ingredients for about five minutes until they start to simmer. Add the cornstarch mixture into the saucepan and continue to stir well. Cook for another three minutes on low heat, stirring periodically.
Step 3: Making The Vegan Chocolate Pudding
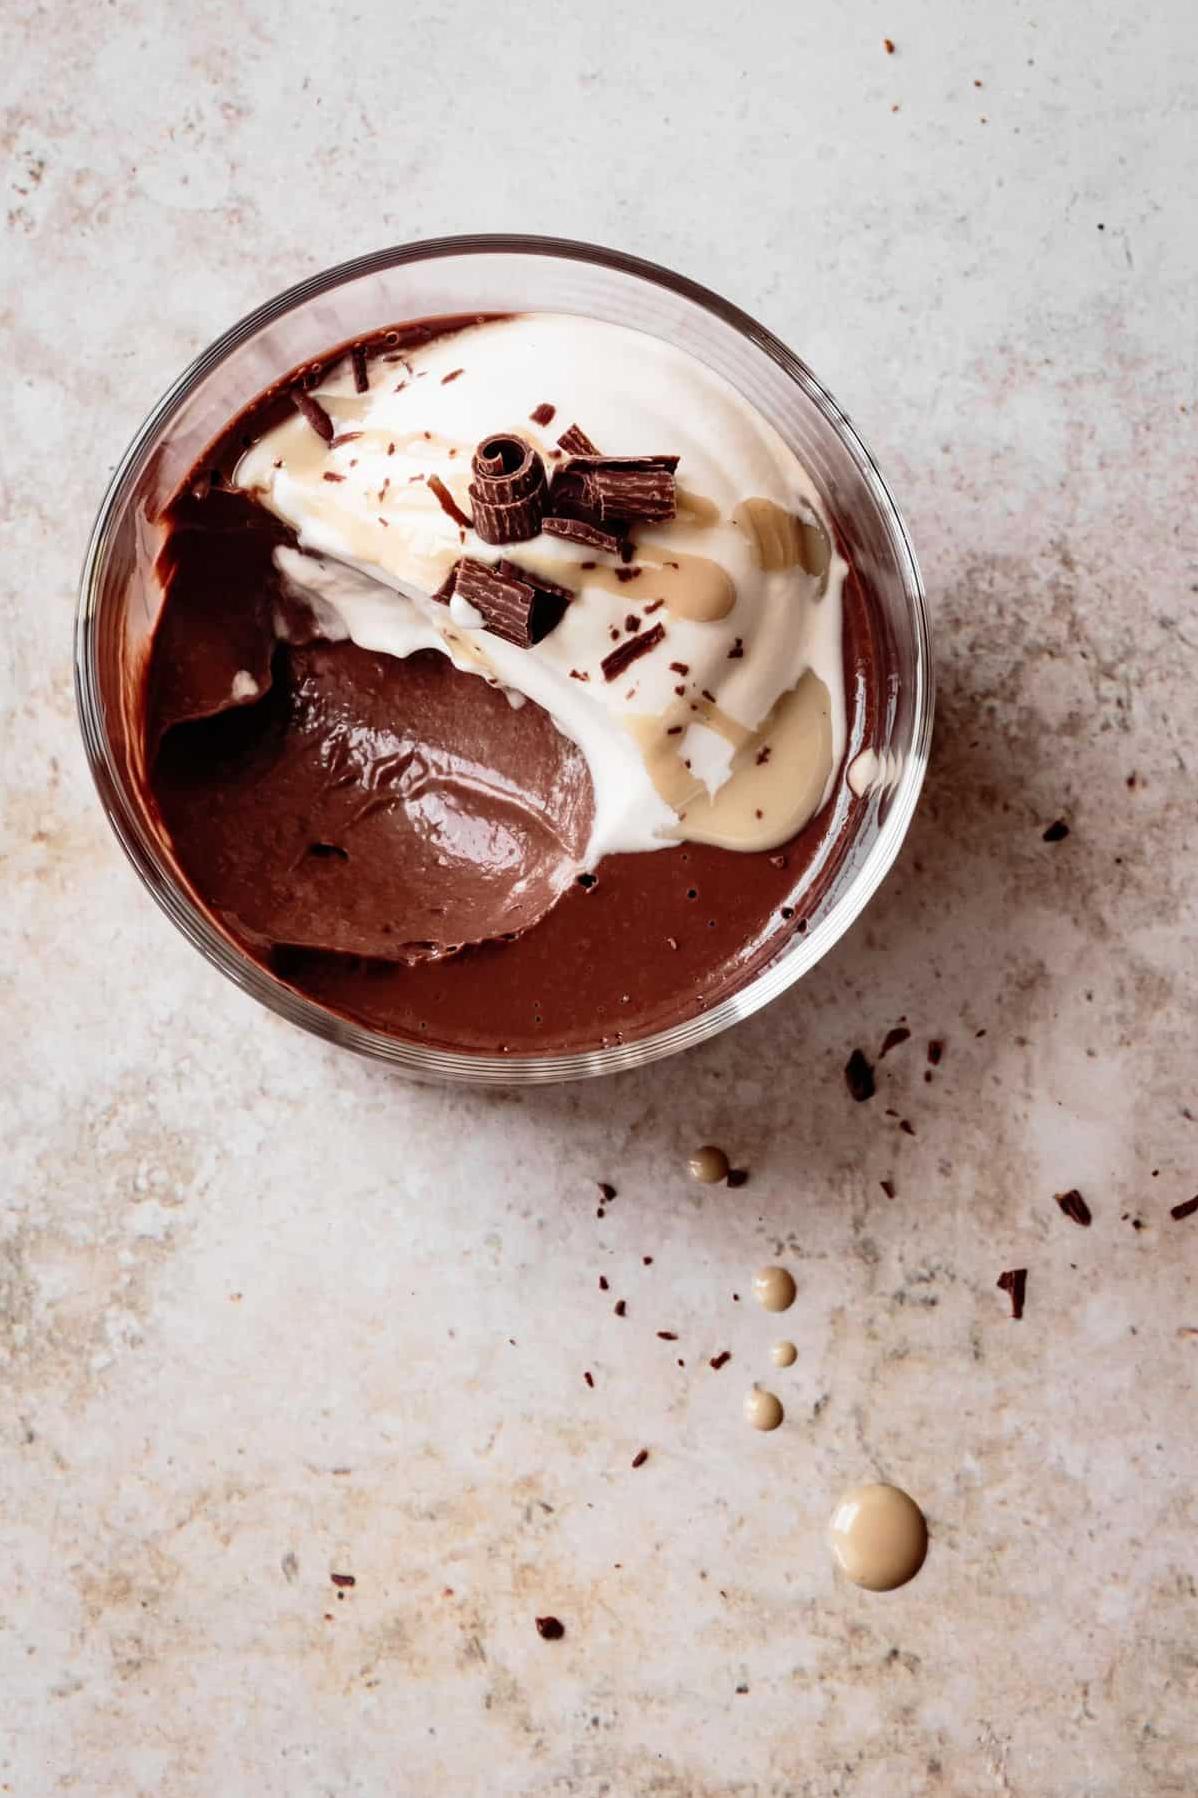
Once the mixture has thickened considerably, remove it from the heat and add two ounces of melted unsweetened vegan chocolate. Mix well until fully integrated. Add � teaspoon of vanilla extract while stirring once more to combine the flavors. Finally, transfer the prepared pudding into a large bowl or individual serving bowls, chill them inside the refrigerator for an hour or two.
Enjoy this delicious pudding on its own or garnish with fresh fruits or nuts for added flavor and texture. These meals made simple provide a great dessert that is perfect for those who are lactose intolerant or simply want to indulge without consuming dairy products.
Substitutions and Variations

Dairy-free and no-cook chocolate pudding can be easily customized with a few simple substitutions and variations. Here are some ideas to suit your preferences and dietary requirements:
1. Non-dairy milk: Any non-dairy milk, such as almond, cashew, coconut, or oat milk, can be used instead of regular dairy milk. Choose the one that suits you best in terms of flavor, thickness, and sweetness.
2. Sweetener: Maple syrup adds natural sweetness and rich flavor to this chocolate pudding, but you can also use other liquid sweeteners like agave nectar or honey if you prefer a different taste. For a low-carb or keto version, try using stevia or erythritol.
3. Cocoa powder: Unsweetened cocoa powder is the base of this chocolatey dessert, but you can also use raw cacao powder for a more intense flavor and added health benefits. Alternatively, you can mix cocoa powder with chocolate chips or melted dark chocolate for a richer and creamier texture.
4. Flavorings: Vanilla extract adds a subtle depth of flavor to this dairy-free chocolate pudding recipe, but you can also experiment with other extracts like almond, hazelnut, or peppermint. A pinch of sea salt enhances the chocolate flavor and balances the sweetness.
5. Add-ins: To make your vegan chocolate pudding more exciting and nutritious, try adding some toppings like fresh fruit (berries, banana slices), chopped nuts (walnuts, almonds), shredded coconut or cacao nibs. Or swirl in some peanut butter or tahini for a nutty twist.
No matter which variation you choose to make, this easy-to-follow recipe will guarantee silky smooth and indulgent chocolate pudding that will please any crowd – whether they are vegan or not!
Serving and Pairing

Once you’ve successfully made this delightful dairy-free chocolate pudding recipe, it’s time to enjoy it as a satisfying dessert or snack. The rich chocolatey flavor of this vegan chocolate pudding is decadent and perfectly complemented with a sprinkle of sea salt on top.
Although this chocolate pudding stands out on its own, it’s also great paired with other ingredients such as fresh berries or whipped coconut cream to add extra flavors and texture to the dish. Alternatively, you can use it as a dip for your favorite fruits such as strawberries, pineapple or kiwi.
This vegan chocolate pudding is a perfect dessert for any occasion, from dinner parties to birthday celebrations, packed lunches or post-workout snacks. It is always best served chilled to enhance its flavor and texture.
So when you’re feeling like indulging in something sweet but still healthy and nourishing, whip up a batch of this dairy-free chocolate pudding and enjoy all the goodness without guilt.
Make-Ahead, Storing and Reheating

One of the great things about this dairy-free, no-cook chocolate pudding recipe is that it can be made ahead of time and stored for several days. Once the pudding has chilled in the refrigerator for at least 2 hours, cover it tightly with plastic wrap or transfer it to an airtight container. It will keep well in the refrigerator for up to 4 days.
If you want to make this recipe ahead of time for a special event or gathering, you can store it in the freezer as well. Just be sure to let it thaw in the refrigerator overnight before serving. This will ensure that the texture remains smooth and creamy.
When reheating leftover pudding, place it in a microwave-safe bowl and heat it on low power for 20-30 seconds at a time. Stir well between each interval until it reaches your desired temperature.
Alternatively, you can reheat the pudding over a double boiler on low heat while whisking continuously until warm. Be careful not to overheat or cook the pudding, as this can cause lumps and change its delicate texture.
Now that you know how to store and reheat this delicious dairy-free chocolate pudding, you can make a big batch and enjoy it whenever you have a craving for something sweet and satisfying.
Tips for Perfect Results

The no-cook chocolate pudding recipe is simple and easy to make, but there are still a few tips to ensure that you get the perfect results every time. Here are some tips:
1. Use high-quality ingredients: Since this recipe relies on only a few ingredients, it’s important to use the best quality ingredients that you can. Use raw cacao powder or unsweetened cocoa powder for a deep, chocolatey flavor. Choose non-dairy milk like almond milk, coconut milk or cashew milk instead of dairy.
2. Whisk well: This recipe requires a lot of whisking to get a smooth consistency, so be sure to whisk vigorously for at least five minutes before refrigerating. You can also use an electric mixer for a smoother texture.
3. Chill before serving: To get the perfect pudding consistency, be sure to refrigerate your pudding for at least an hour before serving. This will allow it to fully set and thicken.
4. Experiment with toppings: While this pudding is delicious on its own, you can mix things up by adding different toppings like sliced bananas or fresh berries for a burst of flavor.
5. Adjust sweetness levels: If you prefer your pudding more or less sweet than the original recipe suggests, adjust accordingly by adding more or less maple syrup.
By following these tips, you’ll have a perfectly smooth and creamy dairy-free chocolate pudding every time!
FAQ
Now that you have read through the entire recipe, you may be wondering about a few things. In this section, we will address some frequently asked questions about this dairy-free and no-cook chocolate pudding recipe. Whether you are new to the world of gluten-free or vegan desserts or simply looking for more information, read on to clear up any confusion and make sure your pudding turns out perfectly.
What is the best non dairy milk for chocolate pudding?
If you’re steering clear of dairy, there are several fantastic alternatives to choose from when making pudding. Coconut milk, almond milk, cashew milk, and soy milk each have their own unique taste that can bring depth and dimension to your dessert.
Can you use water instead of milk to make chocolate pudding?
Substituting water for milk in chocolate pudding is possible and yields a tasty outcome, albeit slightly less indulgent.
Why does pudding not set with almond milk?
Almond milk can be used to set both instant and cooked pudding, however, it is crucial to remember to use the appropriate amount. Simply using the same measurement of almond milk as regular milk will result in a consistency that is too runny to set.
Can you substitute coconut milk for milk in instant pudding?
For those who do not have any nut allergies, almond milk, coconut milk, and cashew milk are great substitutes for dairy milk. Personally, I prefer to use rice milk when making Jell-O pudding for a non-dairy option.
Bottom Line
Fellow food enthusiasts! I urge you to try this dairy-free, no-cook chocolate pudding recipe that will satisfy your sweet tooth and keep you healthy. It is made with wholesome ingredients such as coconut meat, almond milk, and maple syrup. The combination of cocoa powder and sea salt gives it a rich flavor that will make your taste buds dance with joy!
The recipe is not only delicious but also versatile. You can substitute the ingredients according to your preferences and dietary requirements. You can also make it ahead of time, store it in the fridge, and reheat it whenever you crave something sweet.
So why not indulge in a guilt-free dessert without compromising on taste? This vegan chocolate pudding recipe is sure to please everyone at the table and leave them asking for more. Meals made simple and healthy – that’s what this dairy-free vegan chocolate pudding recipe is all about!

Dairy Free and No Cook Chocolate Pudding Recipe
Ingredients
- 2 cups coconut meat (from young coconuts)
- 3/4 cup coconut water, at room temperature (or more, if needed to thin)
- 1/2 cup maple syrup (reduce maple syrup if you want it less sweet)
- 1/3 cup agave nectar, found in health stores (cactus syrup)
- 1/2 cup cocoa powder
- 2 tablespoons vanilla extract
- 1/4 teaspoon sea salt
Instructions
- In a Vita-Mix or high speed blender, puree all the ingredients until completely smooth, stopping to scrape the sides as necessary. Transfer to bowls and chill form a firmer pudding, or eat it straightaway. Try this with raspberries and fresh mint, or chopped nuts. Serves 4.
- NOTE: Young coconuts are found in Asian markets. The whole young coconuts generally come with the husks trimmed down, so they sit flat with a pointed top. To open these coconuts, a cleaver is your best bet. You can use a chef’s knife, but if you do, make sure it’s an old, inexpensive one! Lay the coconut on its side, securing it so that it won’t roll Try not to hold the fruit with your free hand while you make the first cut (in case you have particularly bad aim!). Holding the knife high, bring it down sharply near the top of the coconut. The knife should sink in about 1/3 of the way, breaking through the inner shell. Quickly set the coconut upright so as not to lose the water to the cutting board. If you didn’t succeed in breaking the inner shell, rotate the shell and try the technique again. Drain the coconut of its water into a blender or bowl, then use the cleaver or knife to finish cutting off the top to get at the meat.
- The meat will range from very thin and very soft (sometimes even with a pale purplish hue in very young coconuts), to thicker and firmer. The firmer meat is best for recipes that call for noodles or pasta squares. Sometimes you have to open a few before you get one with nice firm meat, but the soft meat is perfectly good for sauces and smoothies, and coconut meat freezes beautifully, so all of it is good to use. The best way to get the firmer meat out is by using the back of a spoon to pry it from the sides of the coconut, then trim away any of the shell residue with a paring knife.
- The Raw Truth—The Art of Preparing Living Foods Jeremy A Safron.
Add Your Own Notes
Nutrition
Recommended Recipes Just For You
None found